Categories
Uncategorized

Conwell Quotes – WordPress Plugin With a Backdoor

Conwell Quotes is a malicious WordPress plugin that hides a reverse shell in a backdoor behind legitimate plugin functionality. This is used for offensive security purposes.

Here is a direct download of version 1.0 of the plugin that you can add to WordPress.

You can find the open source code on GitHub.

Modeled after the Hello Dolly plugin which comes packaged on all new WordPress installation, Conwell Quotes displays a random quote on each page of the WordPress admin portal based on Conwell’s Acres of Diamonds (which is one of my favorite books). It also uploads an error.php backdoor that can be used to open a reverse TCP shell. The reverse shell code was mostly written by Pen Test Monkey. The print lines have been either commented out, suppressed, or slightly modified to avoid detection.

Offensive Security Use

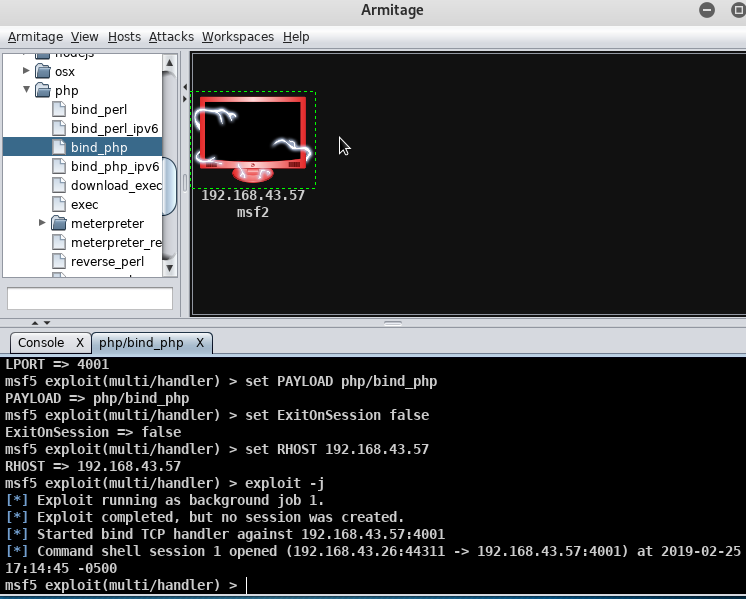
You’ll want to change the port and IP address of error.php to match your attack system and then upload the plugin or use in combination with the spear phishing sample below.

Upload the plugin to WordPress, use netcat to open a listener on your attack machine, and then open /wp-content/plugins/conwell/error.php in a browser. The screen will most likely clock, but will not display an error message that tips off the reverse shell.

Note

Some hosts, like Bluehost, have their WordPress accounts on non-dedicated IPs which means they have nearly all ports blocked. You may not be able to use the malicious shell in error.php. However, the legitimate functionality in Conwell Quotes will still work and the user will not receive any error message.

When uploading the plugin, WordPress does not have any malware detection and so the plugin will install and activate as usual. To get access to the reverse shell, the plugin does not need to be activated, it simply needs to be installed. Yet another good reason to delete out any unused WordPress plugins.

Used with Spear Phishing

Subject: Great book.

Hello [name],

I know how much you love writing and great quotes. Check out Russell Conwell’s Acres of Diamonds on Wikipedia.I think you’d love this book. In WordPress you can install the Conwell Quotes plugin which will rotate great Conwell quotes on your WordPress dashboard–which is awesome!

Enjoy!

[name]

Next Steps

Now that I have more experience writing plugins with WordPress, I think I can write a plugin that can be used to detect the presence of an unexpected reverse shell – a malware defender so to speak.

Do this one thing.

Make sure you delete, and don’t just deactivate, unused WordPress plugins.  This is a perfect example of the malicious code residing in the plugin even if it is deactivated.

Categories
Uncategorized

Information Lifecycle Management (ILM) in AWS with S3 Glacier and Lifecycle Rules

For a few months now I’ve been meaning to put an automated rule in place to save money by moving untouched S3 data over to S3 Glacier.

I previously wrote about how I set my personal blog to backup to AWS the first of every month. It was a fun project, but I began experiencing a micro-chasm of what real businesses experience: the first month my bill was $1, the second month $2, and now by the fourth month, $4. No biggie when you’re just one guy with a personal blog, but the relevancy of this exercise for a real company is obvious.

Every month I add an additional ~35GB into S3. I have this fully automated so no action taken by me – except to pay the monthly bill. Which is also automated – ha!

This was a quick project. I created a new Lifecycle Rule in the management tab within S3, set my object creation target to Glacier (cheapest option) and set the rule to move my files over within 5 days and any previous versions of the files over within one day. I set the rule to cleanup any modified or damaged uploads and set the rule to run. It will now run daily.

Categories
Uncategorized

Maintaining Presence and Installing Backdoors

By completing this exercise I learned that the best backdoor is one that you don’t need to install yourself! There are two backdoors that I opened up within the Metasploitable 2 operating system (msf2).

The most powerful and easiest backdoor was to login using the root shell, create a new superuser, and then add this user into the SSH list so that I could make use of the existing SSH server configuration. Easy-peasy.

I also wanted to install a second backdoor in the event the SSH server was turned off, my new user was spotted and removed, or one of the other root shell access points was patched. Keep in mind, all the work I’ve done, to this point, I still do not know the root password.

In brief, I created and uploaded a bind_php shell payload. I connected with a root shell, logged into the Apache server, uploaded the compromised payload which looks just like a regular PHP file, installed a listener on my attacker machine and then wired together the PHP exploit and the listener. I consider this attack to be beyond basic and maybe moving into the intermediate category. Let’s break it down.

Payload

I used MSF Venom to create a compromised PHP file. I then uploaded and buried this file within the Apache directory.

Listener

After uploading the compromised PHP file, I configured Armitage to listen to port 4001 at the target machine.


Once Armitage was listening, all I had to do was navigate to the infected PHP file in any browser and it would connect to the listener automatically. I now have persistent access to the host in a much more stealthy way.

Advantages

The PHP backdoor is difficult to identify. Unless the user is monitoring their own traffic on port 4001, it is unlikely they will spot the file hidden within hundreds of PHP files.

Also, the backdoor only connects and runs when I fire it up remotely, so it is less likely to be spotted.

This technique uses the existing www-data daemon within Apache. It doesn’t require access to any of the users within the operating system. This is useful in the event that SSH access is closed or my new superuser is discovered and deleted. I can log in when I need to, browse around the file tree, upload additional compromised files if needed, and download the /etc/passwd file and use John the Ripper to try to gain access to one of the existing accounts.

Update: I subsequently did crack a few of the other operating system accounts using John. I have previously written about my experience with John so I tried to avoid using the same techniques in this lab.

Challenges and Learnings

This was a fun exercise and much more challenging for me. I feel very proud about this work and feel I’m beginning to move beyond basic techniques into more advanced approaches.

I learned several important lessons.

1.) Having root shell access is much more powerful than gaining shell access through one of the lower privileged daemons. The daemons are plenty useful, nonetheless.

2.) I struggled mightily in crafting the right payload, getting the permissions correct to run it, and then connecting up the listener. I was getting an Access Denied error on the payload until I changed ownership to the www-data service. I am sure someone more skilled than me would have found a way for Apache to run the payload as root maintaining superuser access in the shell. I guess I compromised for a little less here.

3.) It would be good for me to create a username/password scheme because the PHP backdoor would be discoverable and usable to other attackers that are scanning the web files.

4.) The PHP backdoor is really easy to remove if spotted. All the user needs to do is delete the file. So in a way, while it is well hidden, it is brittle and speaks to all the more reason to install redundant backdoors.

Conclusion

Over the past two months I compromised the host, exfiltrated data, and installed multiple backdoors to maintain presence. At this point, I’m now going to turn my attention higher in the stack and start working more diligently on web vulnerability scanning through OpenVAS, Vega, Burp Suite, and other man-in-the-middle proxies.

Categories
Uncategorized

Exfiltrating Data from MySQL and Postgres

I continued experimenting with Metasploitable 2. Over the past few days I managed to gain access to the MySQL and Postgres databases and used net cat to dump the databases and export them.

Using a similar technique as before, I used a reverse shell exploit to control the host, I launched mysql, queried the database to view the users, and found that two users didn’t have passwords.

I then used the guest account to dump the tables into a zip file and used net cat to send the file from the host over to my attacker.

After

After the file arrived, I unzipped it and could see the contents from the user table within the dvwa database.

I repeated a similar chain of events for the Postgres databases. I was able to find the list of users, change the password for the main Postgres account, browse the tables, and then log in directly using the psql exposed service. Nothing noteworthy in the tables so I skipped dumping them.

Overall, this was a good project. I have also been working on maintaining presence and installed two backdoors. More on that tomorrow maybe…

Categories
Uncategorized

Got Root? Two More Exploits.

I’ve continued my experimentation with the Metasploitable (msf2) operating system as well as the Metasploit framework. I’m now up to five, I think, total successful exploits. I will write about two more of them here. The first, most basic, exploit I wrote about previously took advantage of a misconfigured rsh-server.

My next two exploits followed the same pattern:

  1. Conduct an nmap scan to see what services are exposed.
  2. Find open ports and search Metasploit for a highly probable exploit or exploit + payload to open a reverse shell with root access

I was successful in exploiting the IRC server running on port 6667 and Java server running on port 5432.

I think the exploit of IRC server running on 6667 was added to msf2 just to give newbies like myself something to practice on. I see little point in running an IRC server in light of more modern collaborative technology and the exploit we used is very dated and specific:

unix/irc/unreal_ircd_3281_backdoor This module exploits a malicious backdoor that was added to the Unreal IRCD 3.2.8.1 download archive. This backdoor was present in the Unreal3.2.8.1.tar.gz archive between November 2009 and June 12th 2010.

This is a great first exploit for Metasploit because I got to learn the software and run it successfully. It was the simplest of configurations–set your remote host IP address and go. Nothing more.

The second exploit I discovered is also dated (from 2011) and runs on Java. It was a little more complex.

multi/misc/java_rmi_server This module takes advantage of the default configuration of the RMI Registry and RMI Activation services, which allow loading classes from any remote (HTTP) URL. As it invokes a method in the RMI Distributed Garbage Collector which is available via every RMI endpoint, it can be used against both rmiregistry and rmid, and against most other (custom) RMI endpoints as well. Note that it does not work against Java Management Extension (JMX) ports since those do not support remote class loading, unless another RMI endpoint is active in the same Java process. RMI method calls do not support or require any sort of authentication.

This module requires picking and also delivering a payload. My first payload failed, a generic shell. The next payload I chose, a java reverse tcp shell, worked and I gained root access for the second time today.

Learnings

I’m getting more familiar with Metasploit as well as starting to see more clearly the holes in msf2. Up until this point I have resisted using Armitage, a visual UI for Metasploit, because I really wanted to learn about Metasploit directly. I think I will pick up Armitage soon if for nothing else, I think it will be a lot faster. I’m resisting the urge to just let Metasploit do all the thinking for me. I am intentional on what exploits I use and then trying to really understand why they do or do not work.

Update: I’ve since gained access to Postgres through the server and used psql to create/alter users and browse the tables.  I want to be thoughtful to make sure I keep learning.  I will not just get locked into the pattern of nmap >> metasploit >> root shell.  I was disappointed to see there wasn’t any fun data inside the postgres tables in msf2 and so no real incentive to learn how to exfiltrate the data.

I suspect many Metasploit users hit the stage I’m at pretty early on. Which is a lot of enthusiasm for hitting pay dirt occasionally, and the draw to stay locked in the same exploit pattern.


Categories
Uncategorized

My First Metasploitable Vulnerability, Exploit, and Fix

In getting started with Metasploitable (msf2), I was looking for a simple first vulnerability and exploit to really try out and get some momentum in my learning.

A really simple nmap command let me know that a lot of ports were open. There’s a great deal of practice I’ll be able to put to the test through msf2. I started by noticing the unix login port 513 is open.

From there, I installed the rsh-client on Kali (sudo apt-get install rsh-client) to see if I could gain remote access using the command rlogin -l root ipaddress.  Success!

Then I took a look at the .rhosts file and I found it contained ++.

Here’s what’s going on with this vulnerability. msf2 has an rsh-server running and allowing remote connectivity through port 513. This allows remote access to the host for convenience or remote administration. However the .rhosts file is misconfigured. The ++ signifies that all computers should be treated as friendlies and be allowed to connect. The /etc/hosts.equiv file has the same setting.

Fixing the vulnerability

To fix the vulnerability we need to remove ++ from the .rhosts file. By writing null into the file you can see the next time we try to connect we now need the password! Vulnerability fixed and first legitimate use of msf2 is a success!

Categories
Uncategorized

Building a Hacking Lab

I spent the afternoon yesterday building a local hacking lab. After installing Ubuntu and VirtualBox, I grabbed a copy of Metasploitable (msf2) as well as a copy of Kali. msf2 is a version of Ubuntu that intentionally has a number of security vulnerabilities built in to give you a chance to practice your offensive security techniques.

One adjustment I had to make was to tweak the VirtualBox settings to bridge the network connection for msf2 and Kali. The default setting was NAT and what was happening was the host was sharing the IP with each virtual machine so when I ran an nmap scan from Kali over to msf2 it showed all ports closed. That’s when I realized I was essentially recursively scanning Kali instead of msf2. Made the adjustment and was good to go!

Categories
Kali maltego Uncategorized

Graphing Intel with Maltego

Maltego is a powerful intelligence gathering utility that allows simple and visual reconnaissance of a host, website, person, and a whole heck of a lot of other topics that can be extended with utilities available in the Transform Hub.  I did some straightforward querying on my own infrastructure for technicalagain.com.

There are other utilities available to pull down some of the same information as Maltego, but none that I have come across that are as powerful outside the terminal and none are nearly so visual.  

For large scale penetration testing with a team of testers, I definitely see the benefit Maltego offers in visually linking and storing as much information as possible about a target prior to moving into the threat modeling phase.  I think of this akin to a team of detectives building out a whiteboard filled with as much information profiling the potential perps.

Categories
crypto ecdsa Uncategorized

Generating Public/Private Key Pairs

My public key is copied at the bottom of this post. I used ecdsa instead of RSA due to the exponentially longer time it would take to brute force–and at a size of 521 bits that should be practicably impossible. Great write up on the topic here.

As with elliptic-curve cryptography in general, the bit size of the public key believed to be needed for ECDSA is about twice the size of the security level, in bits. For example, at a security level of 80 bits (meaning an attacker requires a maximum of about 2^80 operations to find the private key).

ecdsa-sha2-nistp521 AAAAE2VjZHNhLXNoYTItbmlzdHA1MjEAAAAIbmlzdHA1MjEAAACFBAD2RCeJQb/fwNGwYDFTbVbDcNYSDpj9xnaDGzbmcrPHDhRjzf6uhlXYyhQXASvhGVsmCWLSyFshspZa56/p1T4KdQFUa1CJ6fABN4T4YJDoRMLYmVNt8763UjjmBWUb1tSV0yuBCToqf15nhrc0r3svN6ZZQzAJvCmmlW3WSBUq3p4f5g== delf@delf-MacBookPro


Categories
Kali nmap tor Uncategorized

Avoid Detection with Nmap Stealth Scan and Tor

The nmap stealth scan -sS flag allows you to search for open ports by adjusting the TCP/IP three way handshake:

The handshake ordinarily is SYN -> SYN ACK -> ACK

The -sS flags change the handshake to SYN -> SYN ACK -> RST

Defined: Synchronize, Acknowledge, Reset

This makes it less likely, but certainty not impossible for an intrusion detection system to pickup the scan.

The best approach that I can think of would be to use the -sS flag and between each port tested use Tor to change IPs from within a regionally anticipated region based on the purpose and location of the target. There is a great write up on how to do just that here using Tor and Proxy Chains to use public proxies.

The article also mentions using the tor-resolve feature to resolve a hostname to an IP address to avoid all of your queries going through the DNS server of the ISP.  Nmap allows the -n flag to never use DNS name resolution and the -Pn flag to avoid host discovery.

 That leaves me with the following command after using tor-resolve on technicalagain.com: sudo proxychains nmap -sS -n -PN -v 173.194.34.174

Update: Also don’t forget the -O flag to learn the operating system and hosting service.